top of page

Updated: Sep 23, 2020

Created by Maya Ankenbruck


Hello it's Maya from the South Haven Center for the Arts!

Today we are going to be drawing on our backs with a piece of paper taped to the bottom of a chair. This exercise is inspired by the South Haven Center for the Arts' Frida Kahlo theme. Frida Kahlo is a self-taught, Surrealist and Magic Realism female artist. She had polio as a child and then suffered a bus accident at the age of eighteen. The bus accident left her with lifelong pain and medical problems. Due to this she made her paintings in an unusual way. Her canvas would be suspended in the air above her and she could paint with her limited movements this way. Frida Kahlo was in her bed most of the time, in the same space every day. She maneuvered around obstacles in her life to make beautiful, deep art. Sometimes pain creates great art, sometimes life is very challenging. Sometimes a new perspective can be enriching, or inspiring, or just gives a new outlook on your surroundings.


Materials Needed

  • Chair

  • Piece of paper

  • Tape

  • Drawing utensil

  • Mirror

Watch the DIY Tutorial Video!


To begin this exercise you will need a chair, a piece of paper, tape, and a drawing utensil. I recommend also having a mirror as I would like you to draw a self-portrait. We will tape the paper to the underside of the chair, get under the chair, and draw a self-portrait from this new angle. In Frida Kahlo’s self-portraits, she used many symbols. Maybe you would like to add things that are very important to who you are into your art piece. How do you feel while making this art piece? Is it difficult? Does it give you a new perspective? What did you think about while making your self portrait?


Other variations of this perspective exercise could be, looking at yourself upside down in a mirror and drawing your portrait that way. I was looking at myself upside down and I just looked very different than I would normally, it was interesting. You could see how it would feel to draw without your writing hand, draw with your less dominant hand or try and draw with your toes or hold a drawing utensil in your mouth. These are also a way of getting a new perspective on creating art, trying new things can give you great inspiration. What other ways can you think of to create art in a new way? How can you look at yourself at a new angle?


I would love to see all of your ideas and creations, share your photos with us at info@southhavenarts.org.

Self Portrait drawing by Maya


Maya Simone Ankenbruck was the South Haven Center for the Arts' Intern for the summer 2020 season. This opportunity was made available by a grant from The Greater South Haven Area Community Foundation.

66 views0 comments

Updated: Sep 23, 2020

Created by Maya Ankenbruck


Hello, I'm Maya Ankenbruck here on behalf of the South Haven Center for the Arts.

As we are focused on Frida Kahlo, I think it's important to mention her love of animals. She loved her various animals as children and owned macaws and parakeets, Bonito the parrot, a fawn named Granizo, spider monkeys, Fulang Chang and Caimito de Guayabal, an eagle and hairless Xoloitzcuintli dogs with ancient Aztec lineage. These animals would often be shown in her paintings. They were her companions, her friends.


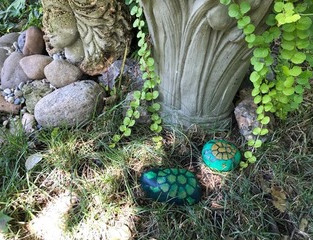
I would like all of you to think about your pets and possibly how you have become closer with them through this time of staying at home and staying safe. I personally have a box turtle named Mabel and I do feel like I know her routines and mannerisms better now. I would love to see pictures of your pets in quarantine, or an imaginary pet, or your stuffed animal that is your companion.


Materials Needed

  • A rock

  • Paint, probably acrylic paint or gouache because it dries quickly, or a good marker or a paint marker.

  • Paint brushes and a cup of water and a paper towel for cleaning

For this exercise we will be honoring our animals by creating art for them. You will need a rock. Some paint, probably acrylic paint or gouache because it dries quickly, or a good marker or a paint marker. You will need some paint brushes and a cup of water and a paper towel for cleaning.


I would like you to find your perfect rock, maybe go to Pilgrim Haven, the beach there is full of all kinds of rocks. Maybe find a rock that somewhat looks like the shape of your animal because we are going to paint our animals on our rocks. Haha! All rocks already remind me of turtles so I will have an easy time finding my rock. Once you have your rock you can set up your painting space, maybe put down a tarp or go outside. You may want to take a picture of your pet to draw from because they are usually moving around. You may want to draw out what you are going to paint before you do paint but it is up to you.


While creating or observing your pet think about, If you were to paint your pet, what would you add? What makes them, them, what symbols or items would you place around them, what do they like and dislike, who is your pet?


I got this idea from my neighbors who were painting rocks and giving them away or taking donations for the Al-Van Humane society. They did not paint their pets, but lovely nice sayings that could brighten a person's day. I noticed people would get their rock from my neighbor kids and place it around town. It was nice to see little painted rocks everywhere and especially by the Frida Kahlo Garden's because they fit in so well there. So yes, after you are done with your painted rock of your pet maybe you want to place it by a Frida Kahlo Garden. Maybe you want to put it in your front yard or set it in your pets favorite place. You can do what you want with your special rock honoring your beloved pet, it's yours. I would love to see all of your creations! Send photos to info@southhavenarts.org.


Watch the DIY Tutorial Video!


Maya Simone Ankenbruck was the South Haven Center for the Arts' Intern for the summer 2020 season. This opportunity was made available by a grant from The Greater South Haven Area Community Foundation.


42 views0 comments

Updated: May 19, 2022

Created by Maya Ankenbruck


Hello everyone, I am Maya, here on behalf of the South Haven Center for the Arts. Today we are going to be making Papel Picado which means punched or perforated paper, like a hole punch. The Papel Picado is used for various celebrations and they are very vibrant in color. They will be hung throughout the streets of Mexico for Dia de los Muertos festival, or Day of the Dead. A day for Honoring our ancestors who have passed. Maybe you would like to remember a grandparent or a beloved pet while making your own Papel Picado. 


Papel Picado is considered Mexican Folk Art. They are flags, or banners that display images to represent different things. Common symbols in Papel Picado art are, birds, flowers and nature and skeletons. At the South Haven Center for the Arts we are focused on Frida Kahlo and different aspects of her art pieces. I feel that these representations of the Papel Picado Tradition relates well to the Frida Kahlo theme as they are cultural, floral, symbolical as much of surreal art is, and the colors have different meanings, as do many colors in Frida Kahlo’s art. 


Materials Needed: 


-Paper, can be colored construction paper, colored wax paper, or a piece of computer paper colored on, whatever paper you would like.

-Scissors


That's it!


If you would like to hang it up after finishing you will want string or tape or both and if you would like to color on the paper then you will want crayons or a marker or colored pencils, anything you would like really. It would be very cool to take the side of a crayon, peel off paper, and go to an interestingly textured surface and make an etching by rubbing the side of a crayon on the paper on the textured surface. 


Example of textured surface- tiles, sidewalk, the floor, a hard textured surface. 

For these Papel Picado I am going to make them a bit different from tradition because I enjoy a round Symmetrical design rather than a traditional Square or rectangle shape. It is also more simple to achieve a beautiful design this way.


Watch the DIY tutorial video!

Step by Step Instructions:


1. Okay The first thing we are going to do is take a piece of our beautiful paper and take one corner and fold it diagonally like so. After folding the paper we will cut off the access paper so that we are left with a nice square.


2. The next thing we will do is fold our square diagonally making it into a triangle. Or if you did not unfold the paper to cut which is totally fine then you already have your triangle. We will then fold the triangle into a smaller triangle by folding it in half.


3. Make one more fold so we have another smaller triangle this will be our third fold 


4. Now take the triangle and fold it in half again in a specific way like this.hold so that the top has two legs


5. After this fold you choose to cut off the triangle that has less paper. But I am going to choose to leave it on to have a larger and more square Papel Picado because they are normally square or rectangular. If you remove the little triangle like this (show what i'm talking about) you will have a round design rather than square. It is up to you what you want your Papel Picado to look like. 


6. Now for the scissors, be careful while cutting out shapes. You can draw out what shapes you would like to cut out or you can cut random shapes like triangles, circles, squares, and abstract shapes are great. The way to get a very nice design is to make the shapes not touch too much and to place them so that they seem to fit together like puzzle pieces. 


7. Also an important part of cutting your Papel Picado is to try and not cut all the way across the paper, this will make your Papel Picado smaller. Start the cuts from the sides and if you leave the small triangle paper part on your design then also cut shapes into that part (show what i'm talking about). I think it always looks very nice to cut off the tip of your paper with a diagonal cut. (show what i'm talking about) it will make a little star. In the middle of your design. 


8. Okay, we are cutting our design and when you feel like you are done you can unfold your Papel Picado and see what it looks like. If you want to make more I encourage it, they look great as a group, you could hang them up similar to the traditional hanging with a piece of string and some tape. I am going to put mine in the window because I think they look nice there. I am also going to make more and will show you some shape designs and what they looked like before unfolding them if you would like to recreate a design.

I hope you had fun doing a craft project with me, I had fun doing it. Share your Papel Picado designs with us! Send photos to info@southhavenarts.org.


Maya Simone Ankenbruck was the South Haven Center for the Arts' Intern for the summer 2020 season. This opportunity was made available by a grant from The Greater South Haven Area Community Foundation.

1,716 views0 comments
bottom of page